My rain barrel design


full-view [248K]

The downspout that supplies this barrel is fed by about 600 square feet of roof, so has the potential of about 300 gallons per inch of rainfall (allowing for some losses in the collection process).   Multiply Atlanta's 30 year average annual rainfall of 50 inches by 300 gallons/inch and this one downspout has a one year potential of 15000 gallons.   Similar values apply to the other downspouts where barrels could be installed.   Simple arithmetic indicates that the roof could potentially receive more than 25,000 gallons of rain in a typical year.   I don't have a place to put a container that large.

If your house doesn't have rain gutters, you can place the barrel under a "V" in the roof where the water comes off multiple roof sections.   The top of the barrel will need more holes (because the runoff from the roof will be close to the house in light rain and away from the house in heavy rain) and the entire top needs to be covered with insect screen.   The overall cost per barrel will be a little less: more insect screen used but two fittings eliminated.

The initial barrel was 55 gallons.   It has already been doubled and the two 55 gallon barrels will be replaced by a single 275 gallon tank later in 2008.   The garden plot which this collector will provide water for is about 5 feet by 13 feet.   The garden will be watered either by soaker hose or drip irrigation.   110 gallons of stored water would be adequate between rainfalls in a typical year (not this year [2007], which is the 6th year in a row with less than normal rain).   275 gallons would be adequate even with half normal rainfall, but must be installed in a place that can support over 2000lb (275 gallons * 8.3 lb/gallon = 2282 lb, plus the weight of the tank itself, about 100lb) in a footprint that's a little more than 3 feet by 4 feet.

The barrels are food grade plastic to avoid any chemicals that might harm the plants (I doubt that the sugar and caffeine in soft drink syrup are harmful to plants).   The 275 gallon tank which will replace the two barrels is of unknown origin and will receive several flushes with mild chemicals (baking soda and water to neutralize any acid residue, vinegar and water to remove any alkaline residue, water to remove the flush chemicals).


Intake screens
intake-screens [328K]

The house has overhanging trees, so the intake screens consist of hardware cloth at an angle (so the leaves will be washed away and to keep them off the mosquito screen) plus the mosquito screen over the funnel.   The mosquito screen is attached to the top of the funnel by plastic ties and caulk.   The caulk ensures an insect-proof connection between the screen and the funnel.   The plastic ties keep the screen tight while the caulk sets.   The funnel sits in a hole cut into the top of the barrel and is sealed with caulk.   Water that runs off the hardware cloth and onto the top of the barrel will drain off through the original holes in the rim.
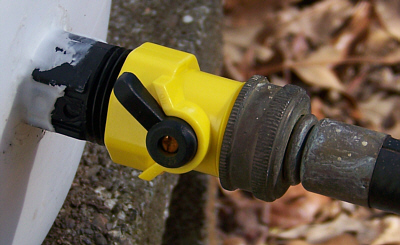
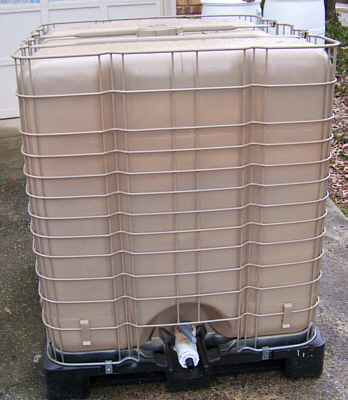


Hose bibb and base
hose-bibb-and-supports [134K]

The base is made of six 12" x 12" pavers and three 6" x 18" pavers which raise the barrel high enough to allow connecting a hose.   The hose bibb is located where the pavers meet to provide "bump" protection for it.
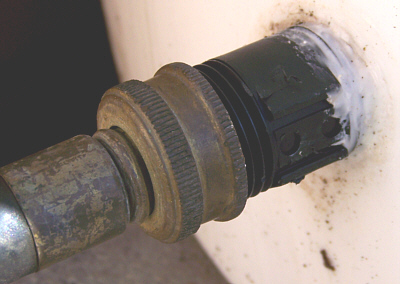
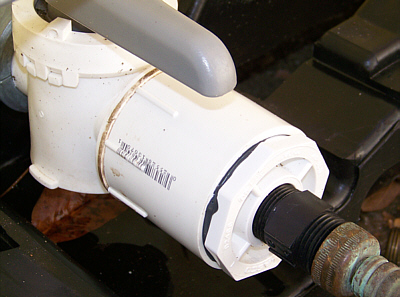


Overflow pipe
overflow [181K]

The overflow pipe and hose bibb are carefully threaded into just-the-right-size holes drilled and filed in the barrel and are sealed with caulk.

The barrels that are placed against the brick of the house will be painted a similar color.   The barrels that will be placed behind existing shrubs will be painted green to be a closer match to the plants.
The white barrels can be painted with Krylon Fusion paint for plastics.   Local sources include Hobby Lobby, AutoZone and other auto supply stores - but I've found limited color selection in the stores near me.   Aubuchon Hardware has the full spectrum of Fusion colors.   If you buy 4 or more cans, the price with shipping is about $1/can more than the local prices and you can get ALL the colors (PDF).


The cost breakdown per barrel is something like this:

barrel   $25.00   (Advance Drum Service Mableton, GA) (was $18.00 in the spring of 2007)

90 degree tailpiece for downspout   $5.00

4" to 3" adapter for intake funnel   $4.50

hose bibb (faucet)   $3.00

fittings for overflow pipe $1.00

2 feet 3/4" pvc pipe   (no cost, left from another project, estimated $1.50)

8" x 18" piece of hardware cloth   (no cost, left from previous project, estimated $0.25)

caulk   (no cost, left from previous project, estimated $0.10)

12" x 12" pavers   (no cost, left from previous project, 6 at estimated $1.50 = $9.00)

6" x 18" pavers   (no cost, left from previous project, 3 at estimated $1.50 = $4.50)

10" circle of mosquito screen   estimated $0.15

Total   $54.00 (was $47.00 in the spring of 2007)

Krylon Fusion paint is about $5-$6 per can, or $10-$12 per barrel   (The coverage of 25 sq. ft. per can is very optimistic - the barrel needs a thick enough coat of paint to block light from entering to prevent algae growth.)

The standard reference for rainwater harvesting is The Texas Rainwater Harvesting Manual, 3rd Edition, which is provided in PDF form.

Rather buy than build?   If you're in the Atlanta, Georgia, area, I also sell and install barrels and tanks in your choice of colors.   Sorry, but I do NOT ship barrels or tanks - it's usually less expensive to find one in your local area.

Functionality update: 21 June 2007
We spent a week visiting the grandkids.   While we were away, the National Weather Service reported over an inch of rain in the area.   The first barrel is full and there are no leaks.   Now to add more barrels...

Functionality update: 28 July 2007
I added the second barrel to this downspout using a 3/4" male pipe thread to hose adapter near the bottom of each barrel.

  The connection between barrels is made with a washing machine hose (yet another leftover, about $6 if you buy new) because it has the needed female hose fittings on each end.   You can add inline shutoff valves to allow isolating each barrel (great if the hose springs a leak).


I'm thinking of adding a couple more barrels at a lower level, so the overflow can be run into them.   That would provide additional storage and the water in the later barrels would be cleaner because the particulate matter in the incoming water would probably have sufficient velocity to go deeper in the barrel than the level of the overflow pipe.   Update: Feeding another container from the overflow line works - the water is noticeably cleaner.   Just be sure the next container has an overflow port at the proper level (at or no more than 1 inch above the overflow port on the first barrel).   Update 2: The filter intended for use with a pressure washer (see below) also does a good job of cleaning particulates from the water flowing between barrels.

The barrels do provide enough pressure/volume to allow using a soaker hose (approximately 0.433psi/vertical foot of water height).   I need to do some tests to determine how many gallons/hour are delivered via the soaker hose (a project for a PICAXE microcontroller and a washing machine flowmeter - I'll post details when it's completed). When the flow rate is known, I can set up a timer to water the garden as needed.

Update: 29 January 2008
A 2/3 full barrel has enough water pressure (about one psi) to provide adequate flow to a small pressure washer (1.5 gpm, 1650psi).   A lower water level is marginal for providing the 1.5gpm flow.   The granular matter from asphalt shingles is very abrasive to finely machined surfaces such as the pump on the pressure washer, so you need a particulate filter in the line before the pressure washer.   I found one in the pressure washer accessories area at the local home center (sorry, don't remember the price).   The filter uses fine mesh to block particulates and can be disassembled for cleaning when needed (I try not to use disposable filters because the last one you have will clog in the middle of a project).

This was also my week to drain and flush the barrels.   Most of the trash in the barrels was particulate matter from the old roof (roof replaced in 2007).   Having two barrels connected at the bottom probably transfers more sediment than a near-the-top connection would, but the secondary barrel had much less than the primary (intake) barrel.   This means that the overflow pipe could be connected to another container to provide slightly cleaner water.   With the current two barrel setup, the connection between the barrels should be at the bottom and the overflow connection should be on the second barrel to provide the cleanest water to a downstream container.   Feeding a container from the overflow connection of a previous container has the advantage of preventing a total water loss because of a single leak, but multiple containers are not as convenient to use.

Update: 1 February 2008
With a predicted 1 to 2 inches of rain overnight, I ran a garden hose from the faucet on the main barrel to the connection on a 275 gallon tank.   This morning the 275 gallon tank is within an inch or so of the top, which correlates with the 1.4 inches of rain reported at the small airport about 6 miles away.   1.4 inches of rain should deliver 400+ gallons of water from 600 sq. ft. of roof, so I didn't have capacity to capture it all.   Looks as though another large tank or two will be in my future.

Update: 26 February 2008
The first of the 250 gallon barrels is almost ready for installation.   I've already installed one for a friend (painted to match the house and semi-hidden behind shrubs - pictures later).   Some pictures during construction of the tank I'll be using.

The original tank after cleaning. With over 200 gallons collected, it's obvious the support cage is needed.   With 8 feet of 3/4 inch hose connected, the flow rate from the tank (at greater than half full) is over 4 gallons/minute (measured by the time needed to drain 50 gallons from the tank).   If your curious about the flow rate from the 2 inch valve, just be sure to stand to the side when you open the valve...


A two inch threaded to 2 inch PVC pipe adapter screws on the valve, then a 2 inch slip to 3/4 inch threaded pipe adapter is glued in to provide a place to screw in a 3/4 inch pipe to male hose thread adapter.


The tank after a coat of Krylon Fusion Satin Khaki paint.


What the embossed volume markings look like after painting.

Download this page as a PDF file.

Note that the pictures show an extra paver in each stack under the original barrel.   The additional pavers were needed because of the heavy duty hose I tested with.   Since there is almost zero water pressure from the barrel, a flexible, lightweight hose is more than adequate. The barrel only needs to be 3 pavers above the ground.

I chose concrete pavers instead of building a support of pressure treated wood for several reasons:
1. strength - a 55 gallon drum of water weighs about 450 pounds
2. durability - they don't need to be replaced because of weathering
3. cost - pressure treated 2x4x8 is $3 (need 3 or 4), 4x4x6 is $6.50 (need 2), 80 lb bag of concrete mix is $4.70
4. convenience - I can move the pavers to another location relatively easily, which will happen when a 275 gallon tank is installed at this downspout. Something with its feet in concrete is MUCH harder to move.

Note that there are a number of "left from previous project" items.   This house is over 30 years old and ALWAYS needs some type of maintenance.

Home
Copyright © 2007-2008 John E. Carter
Last update .